Planning Guide for Dental Treatment Room Design & Setup
How to Design a Modern Dental Treatment Room and Determine the Best Dental Operatory Layout, Size and Delivery Styles

How to Design a Modern Dental Treatment Room and Determine the Best Dental Operatory Layout, Size and Delivery Styles
Considerations regarding the look and feel of a dental office are ideally handled by a dental architect or designer. However the dental treatment room is the most critical and vital as it can and will determine not only your treatment efficacy and productivity but can be detrimental to your ergonomic well being as well as the single biggest determinant of your patient experience. So clearly considering and setting design goals for your treatment rooms should take the most priority and can depend on the type of practice you are setting up. Design goals should be tailored for specialty practices as an Endodontic, Orthodontic, Pediatric or Oral Surgery 0peratory setup will vary.
It is also quite important to design modern day rooms that will still look and be current in the future. It can be quite disheartening to have a brand new office that looks thirty years old simply due to using old fashioned equipment equipment arms and bulky cabinet designs. The following five goals should be considered when designing the modern day minimalist dental treatment room:


Once you have determined your office design goals for a distinctive operatory optimized for treatment, the next step is to decide which type of treatment room style will work best for you. Although there are any number of ways a room can by laid out and configured, dental treatment rooms usually follow three general concepts:
Dental Operatory Room Size – A common question is What is the ideal size of a dental operatory? There is no one straightforward answer as it can depend on not only the room layout but also the instrument delivery systems and their placement. See Key Considerations for Your Dental Operatory Layout and Delivery Method for a range of operatory room dimensions based on Front/Side Delivery, Rear Wall Delivery and Over-the-patient.
Create an operatory design that will be flexible enough to grow with you to help you to achieve your ultimate financial goals. A system that allows modular integration can save significantly on office build out costs by eliminating traditional expensive and bulky wooden dental cabinets. The considerable amount saved by potentially not buying cabinets can go a long way towards the technology purchases you do want to prioritize. Modular integrated dental delivery systems and Assistants’ carts that complement each other can facilitate not only efficient treatment but also work well in conjunction with digital radiography, microscopes and computerized inputs.
The versatility of a custom integrated dental cart system creates several key advantages for dental specialists. The infinite positioning of the dental cart allows the clinician to maneuver their system within close reach during the procedure. It can then be repositioned out of patient view after the procedure is complete. A monitor mount creates an intimate environment for both patient education and clinical use. The attractive work top provides ample space for a keyboard and mouse.


Whether you are designing a restorative dental treatment room setup or a dental hygiene room, choosing the right delivery style for your operatory can effect room size, ergonomics, patient experience, and practice productivity. Planning for a new office is an ideal time to carefully review and select the delivery style that will optimize procedures for you and your dental assistant or hygienist. It is important to determine the method of instrument delivery that is best for you by evaluating and selecting from side, rear or over-the-patient delivery.
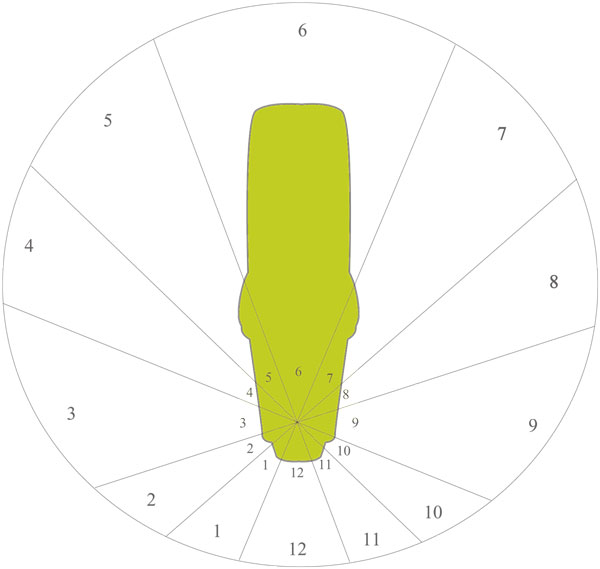
There are a number of common names for the different delivery locations/styles within a treatment room. A standardized method to associate the location for the various names is to use the clock diagram, which provides a handy reference for describing the positioning of instrument access by the Doctor and Assistant. The patient’s head is at the 12 O’clock position while the patient’s feet would be indicated at the 6 O’clock position. For example, a right handed dentist could sit at the 11 O’ clock position and retrieve the instruments from their front side at the 9 to 10 O’ clock position while the assistant sits at the 3 O’ clock position.
Ambidextrous Planning Considerations
Right and left-handed capability can be accomplished with any of the delivery styles. Side/Front delivery dental carts can be attached to a floor junction box located in the center of the room under the foot of the patient chair and then be rolled to either side as needed. Alternately an In-Wall junction box can be placed on both sides of the room to allow the dental cart to be moved to configure the room for right or left-handed use. Rear wall delivery carts have a sliding track that allows dental and assistant’s instruments to move to either side of the dental cart for ambidextrous use.
Ideally, Assistant’s instruments should be located in the rear of the room and not off the side of the chair. This way they are facing the assistant and are easy to access. Efficiency in modern dental treatment rooms require the assistant to be an integral part of the team, making ergonomics and accessibility to instrumentation crucial. Although assistant’s instruments can be post-mounted off of the chair, it is not recommended due to the poor ergonomics and inefficient access for the assistant. This should only be considered if the room dimensions do not allow rear delivery.
Additionally, the rear treatment area can provide work surface holding trays, supplies and auxiliary equipment such as keyboards. Modular systems that easily roll can provide ideal preferred ergonomic placement of instruments, supplies and monitor viewing for the assistant. Lastly, they can be moved to allow the assistant’s egression in a single entry dental operatory layout.


ASI’s exclusive modular instrument panel design allows integration of your preferred instruments in the order you choose. Each modular panel accommodates a wide range of electronic instrumentation including electric high-speed motors, surgical motors, rotary motors, ultrasonics, apex locators and obturation devices. Select from various brands while choosing the placement of each instrument, and control them all with a single foot pedal. The modular design allows for easy up-gradeability of your instruments or incorporation of new technology as it develops. Furthermore, the handpiece bar can accommodate an abundance of instruments that can be configured to the way you practice. Accessory brackets can also be utilized to add work trays or additional instrumentation to the sides of the delivery system. The customizable configuration allows ergonomic and efficient hand access to the instruments you need when you need them.
Consider designing your system to neatly integrate computer monitors, USB connection ports for digital radiography, CPUs, 3D microscopes, camera recorders and any additional required cabling within the system with convenient access. This makes the entire system your communication control hub from treatment instruments to diagnostic devices.
Patient Experience Opportunity – Adding a computer monitor on top of the delivery system is an easy method to make it look less intimidating and more diagnostic. Patients have become accustom to a wide range of hospital diagnostic units, such as ultrasound devices that look like mini computer carts. Making the treatment unit resemble more of a medical diagnostic cart elevates the specialization of your practice, and makes it more disarming at the same time. Having a front side monitor is also ideal for providing patient education and treatment planning.


Convey the ultimate perception to your patient that the treatment they are receiving is a highly specialized procedure from someone with true expertise. Consider the patient’s perspective of value and confidence while in a fully-integrated, seamless treatment room rather than looking at scattered instrument control boxes, multiple foot pedals, and a multitude of cords draped across countertops.
In addition to instrument integration, it is important to keep power/ computer wiring and utilities safely and attractively hidden from view. Use internal cord management and storage within the cart to neaten the appearance of the delivery cart. A single umbilical allows compressed air, suction, electrical and computer data cables (network, USB, video) to be neatly organized and routed to either an In-Wall or In-Floor Junction box.
Foot Control Placement
An aspect of a new dental operatory design to consider during architectural planning is the placement of the foot control. The foot control tubing can be run underneath the floor through a conduit from the junction box to the patient dental chair. The end result creates easy access to the foot control without tubing running across the floor.

STEP 9: Plan for Seamless Utility Connections for the Delivery Systems
Now there are advanced choices in how the utilities and data connections will be made to power the delivery systems. Dentists can choose from a number of modern junction box configurations or to use self contained carts that have an on-board internal air compressor and suction systems.
Dental Junction Boxes
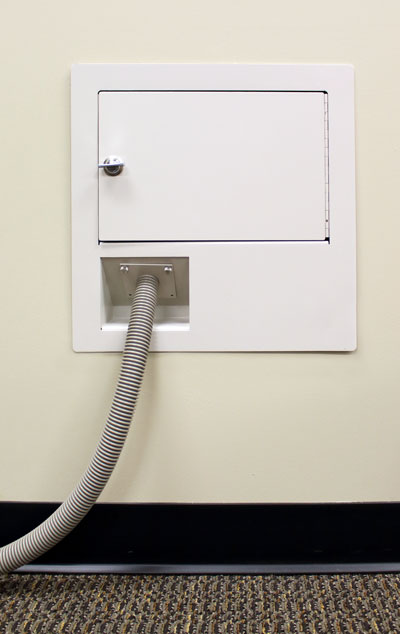
Select from a modern style of dental junction boxes to efficiently manage, conceal and protect your dental operatory air, suction, electrical, computer data cables and chair controls. Select from a variety of durable models including In-Wall, In-Floor and Above-Floor to meet your requirements. The In-Floor and Above Floor models are generally placed at the foot of the dental patient chair and can provide ambidextrous use of a cart to be moved on either the right or left side of the room. The In-Wall Model is placed in the side wall of the treatment room and allows the dental cart to be placed up to the wall for a neat appearance.
Plumb Free Connections
Self-Contained Dental Carts with internal compressed air and vacuum only require a connection to a standard electrical outlet for operation. This makes their placement in the room very flexible and adaptable. This feature can also be very practical when renovating an existing space or adding a treatment room into an area of the office that wasn’t plumbed.
STEP 10: Hire a Professional Design Team
Once you have completed all the preliminary planning for your dental operatory layouts including dental equipment styles, it’s then time to decide how you want your office to appear and be organized around your clinical areas. Do you need to hire a dental architect? Carefully select who is going to design it and determine if they have experience with the nuances of dental operatory design including utilities, med gas and ideal technology connections. Some dentists and specialists choose to use the design services of a dental distributor, and others elect an architect that specializes in dental office design. Your decision should depend on the extent of your project, and should be influenced by whether you are renovating an existing dental space or planning complete ground-up building construction. Your evaluation should also include cost and style factors.
